MAD Scene Creation Tutorial
Intro:
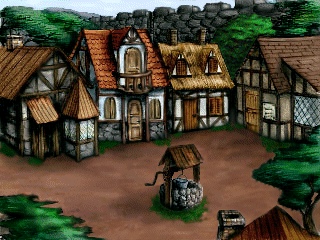
Every scene has 3 bitmap layers: the background, the mask, and the wasc. The background is 24bit background image, the mask and the wasc are 8bit greyscale images.
Using Scengen:
Scengen is the utility you use to compile the 3 bitmap layers into a format used by MAD. It relatively straight forward.
Here is an example of how to generate a scene:
scengen.exe scene.scn scenebkg.bmp scenemask.bmp scenewasc.bmp
This creates the scene file 'scene.scn' based on the bitmaps scenebkg.bmp (the background), scenemask.bmp (the mask), and scenewasc.bmp (the wasc).

The Background:
This is just the background for the scene. Self-explanatory. :)

The WaSc Screen:
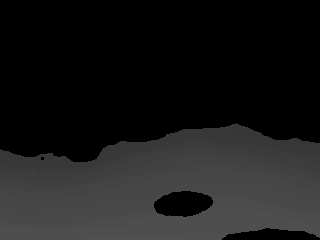
The wasc is actually the wa/sc = Walk Scale screen. All areas of it that are painted with index 0 are designated as unwalkable, and any other index is the percent to scale objects at that point in the image. For example, and index of 100 would draw the object at its original size (100%), and an index of 200 would draw the object at twice its size (or 200%). Depending upon how the background is drawn, you'll want to chose a scale that makes the sprites fit in with it.
Note: Unlike the example screen above (bad example), it is not necessary to outline the walkable area exactly. In fact if you do so any characters walking along the edge of it will change directions frequently, which will look sort of bad. Instead, outline the areas using geometric shapes, try to make the edges in solid lines (with a constant slope). This is faster than drawing a pixel perfect wasc, and will achieve better results.
Also, the point of the image that determines which wasc point to use is the bottom (y) - center (x) edge, this is where the feet would be for most characters. Because it uses the center x, images that are wider than one pixel might get drawn over unwalkable areas. For instance, a character might get displayed over top of the houses in our example. To account for this, you'll want to draw unwalkable areas in the wasc with additional width to stop all parts of an image from touching it.

The Mask Screen:
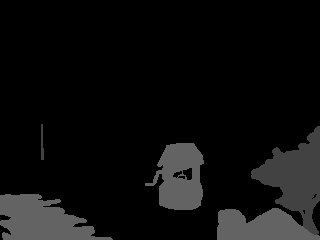
In the mask screen you'll need to draw solid grey masks of objects that the player can walk behind. If two masks are too close together and you can't draw a rectangle around it without them intersecting, you'll have to change the index/color of one of the objects.
In the script each object's rectangle must be defined via NewMaskObj(x, y, w, h, colorindex) so MAD knows the size of the mask object and when to draw objects behind or infront of it. The colorindex is the color's index (in the palette) of the mask. If a sprite's bottom y value is greater than the mask object's bottom y value then the sprite will be drawn in front of the mask, if a the sprite's bottom y is less than the mask object's then the sprite will be drawn behind it.
NOTE: The background image and mask/wasc layers in this example are copyrighted by and used with permission from the Hero6 Project, you may use this image only for example or demonstration purposes. For other uses you must obtain permission from them. Thank you.
Go Back


